Showing posts with label Makeup 101. Show all posts

Monday, August 16, 2010

Makeup 101 - The Eye/shadows

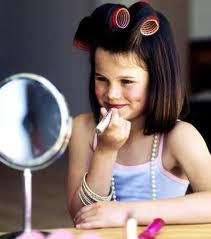
One of my followers requested a post dedicated to eyeshadows. I realize a lot of people, just starting out with makeup, don't know much about it. I remember when i first started out with makeup. I went on youtube, google and read various magazines to help me out. But the best thing that helped me out were beauty blogs.
So this post will be dedicated to the ones that are just starting out, especially my follower who requested this information.

First of all lets learn about the eye and a few tips about everything.
Brow bone - this is basically where your eyebrows arches. This area is a great highlight area, where it makes the eye look brighter and make your eyebrows arch seem higher. You can use light shimmery eyeshadow colors. A few i love using and recommend are Mac Vanilla, Urban Decay Virgin, Almay Ivory. Choose the best highlight that fits your skintone.

Crease - this is your eye socket. Study your eye and wherever you feel your eye socket, that's where your crease is. The colors most recommended to go in the crease are dark matte shades that will give the eye more dimension and make it look larger. Darkening the crease also gives the eye the smokey look.

Lid - this is the area from the lash line to the crease. You can put whatever color you want here. Make sure that you balance colors out. If you have glitter and shimmer on your lid, use a matte shade on your crease. If you have a matte all over the lid color, use a color with more sheen/shimmer to it.

Inner Corner - you don't have to add any color to this area. However, if you do a dramatic look and want your eyes to look more open and bright, this is the area where you add a highlight color (just like the brow bone area)

Waterline - this is a sensitive area for a lot of people. My eyes used to get watery everytime i put eyeliner on my waterline. Now im used to it. This is the area for black (white or colored) eyeliner that shapes up the eye.
Outer Corner - you can do various things in the outer corner. You can smudge eyeliner and connect it with a line that you draw below the waterline. Here's where you start out your crease color (at least that's what i do)

Lashline - this is the area where your lashes are. You can use eyeliner or smudge eyeshadow softly. When you add false lashes, you want to get the as close to the lashline as possible, AFTER you apply your eyeliner.

Makeup is all about experimenting and finding what works best for you. Everyone is beautiful and unique in their own way. Don't copy makeup, then get frustrated if it doesn't look as good on you. It's not because you don't know how to do it, it's because you focus to much on doing it the way you see it, instead of having fun and working it with how you're shaped. I'm speaking from experience. I too copied and used to be so frustrated, until i started to experiment on my own and had fun with the looks i created.

If you have trouble with mixing colors, or confused about which colors match, try it out on your hand. Swatch two or three colors next to each other and see if they would look together on the eye.

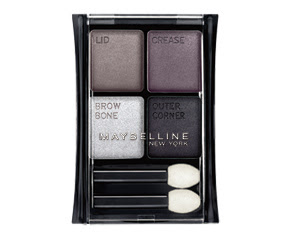
Maybelline makes quads that are labeled, so you know which shade to apply where. This is perfect for beginners, because it makes it easy to create complicated looks in a very easy step-by-step way.

Remember on thing dolls, makeup is not permanent. You can always wash it off if you don't like it. It's all about trials and errors. Practice makes perfect too, so just have fun and enjoy the art of makeup =)

Share with me some of your tips and tricks that you learned as you were starting out with makeup, and i will feature your answers in this post =)

Welcome to the new makeup addicts! =)

Thursday, July 29, 2010

TUTORIAL: How i do my eyebrows!

I've been getting a long of questions on how i do and what i use for my eyebrows. This is one of those posts where im going to feel very naked showing you my eyebrows but im willing to sacrifice lol. My eyebrows are naturally very annoying lol! I've always had thick eyebrows until highschool, when i let my mother pluck them for me....big mistake!... they were good for a while but then they developed a mind of their own and had no shape whatsoever. It takes too long to let them re-grow and re-start the shape, so in the mean time i try to shape them up on my own.

My natural eyebrows
They're not too sparse and not too full either, but very uneven. The reason for that is because my right one has thin blonde hairs so it makes it look bolder and a lot lighter than my left one..(that's how close i've examined them lol!). They're thin because of overplucking and weird shaped because of how im growing them back, they have no definite shape on their own.

Keeping up with my eyebrowsI bought Ardell stencils from my local drugstore. They're the plastic sheet with various shapes of eyebrows. I didn't follow the stencil exactly but i used it as a guideline to at least make my eyebrows even. I don't use this anymore because i know what shape i want. Any little hairs that grow below or above the shape i have i pluck. Since my hairs aren't short, i use eyebrow scissors to cut them a little bit, giving my eyebrows a more tamed look.

What i use
I never used powder to fill in my eyebrows. I have tried the Maybelline Define-a-brow and i really loved it. It filled in my eyebrows perfectly and made them look natural. The downfall about it was that it would finish too fast, so i stopped buying it. I mentioned in various posts about what i use at the moment to fill them in and shape them.And that is the Wet'n'Wild brow/eye liner pencil in Dark Brown. The pencil has a waxy feel to it so it keeps my eyebrows in place and doesn't smudge. I love that especially now that its so hot outside. To apply, i use an angled brush, i don't use the pencil directly because its too dark, and with a brush i can control the intensity.

How i do my eyebrows

I start off where my eyebrow starts, by the bridge of my nose, mark a curved line and draw it along the top, following your shape.
Once i get to the arch, i make sure to curve it to actually create that arch, then continue to draw the eyebrow and finish it.
Then i go back when the eyebrow starts and draw along the bottom, working in a curve upwards until the arch, then bring it back down.
I basically create an outline of my eyebrow, then go back and fill in whatever is left in between.
I always go with a spoolie and brush the eyebrow in the direction it grows, to make it look neat and nice.
Then i draw the other one, and make sure they're even.

Optional step: You can use a clear mascara to tame your eyebrows and keep them in place.
Advice: Your eyebrows are sisters, not twins.... make them look even and similar, so don't get frustrated if they're not identical.
___________________________
Thoughts?

Monday, July 26, 2010

REVIEW: The Makeup Mandate

Ever felt frustrated putting on makeup? Felt overwhelmed with decisions on what products to buy, which are good for you and which aren't? If you find yourself in a dilemma like that, reach out for books that will help guide you and make the makeup world fun!
A book i find extremely useful is called The Makeup Mandate. It is created and written by australian makeup artist Cassandra Rae Ferguson. She specifically created and design this book "to take the myth and mystery out of makeup application, without being dictatorial.

Who is Cassandra?
Cassandra Rae Ferguson is a Freelance Makeup Artist and Beauty Editor with a wealth of knowledge and experience. She has worked with some of Australia's best fashion designers, stylists, filmographers and photographers in the Fashion, Television/Film and Bridal Industries. In addition, Cassandra has been consulted for her expert advice in fashion and bridal magazines, ezines and women's forums. Cassandra studies Makeup Artistry in Sydney, before gaining experience throughout Australia. She currently lives and works in Sydney, Australia.

The Makeup Mandate

This book offers a ton of information to help you create different makeup looks that match you features and accentuate your natural beauty, while you enjoy and have fun with the experience. It's basically like a makeup course that contains expert advice, trade tips, secrets and step-by-step instructions. In many other makeup books, it assumes you already know the basics, but this is easy and comprehensible for beginners and its applies easily to everyone. In the book, Cassandra pays little attention to the labels and stereotypes. She encourages the reader to discover their own style, rather than just following trends dictated by others. The Makeup Mandate offers plenty of useful information to readers of all ages, ethnicity and lifestyles.

My personal opinion...
I think its an amazing book. It's written very clearly and simple. She offers some very helpful hints and ideas that you can use to make other entire makeup experience fun. Cassandra has sketches included that would make it easier to understand her description. There are pictures of products she mentions (eg, brushes, tools, etc.) that help the reader understand better. It offers alot of detailed information that is stretched out in about 22 chapters.

What do the chapters talk about?
  1. Introduction is talking about the madate ideology.
  2. Second chapter is letting you discover your style. It's called Fun,Not Forceful.
  3. Tools Of The Trade offers a basic checklist of equipment that makeup artists often use. She goes on explaining in detail what each product is used for in a kit and offers helpful tips.
  4. Face Facts focuses on facial structure. She basically gives you a "map" to the face, so you can learn to follow instructions later on in the book.
  5. Skin Deep is the chapter that talks about preparing your skin for makeup - very important step.
  6. First Base helps guide you through every form of foundation and powder application, including tips and tricks.
  7. Shape up explains in great detail each facial shape, pictures of models and sketches included, so you know how and what parts of your face to contour and highlight.
  8. Light And Shade teaches you tips on how to highlight and contour your face to make it look natural.
  9. Blushing Beauty helps you enhance your cheeks. She talks about various types of blushes (powder, creams. etc) and ways to make them look natural and gorgeous.
  10. The Eyes Have It. This chapter helps you define your eyes, depending on the type of eyes you have. This chapter is very detailed and includes sketches of different eye shapes and sizes. It goes on talking about eyeshadows and everything that includes eye makeup and eyebrows and eyelashes.
  11. Pucker Up focuses on the low-down on lips. She offers suggestions and hints that are very helpful when it comes to various lip shapes and enhancing what you have.
  12. Balancing Act helps with eye and lip combination. It offers advice and suggestions on how to balance eye and lip makeup to make enhance your unique features. (pictures included)
  13. Tint Test talks about color in makeup. It teaches you to be more confident when it comes to be more dearing and wear more colorful makeup. I personally think this is the most helpful chapter that really explains in detail everything you need to know about using color.
  14. Come To The Surface simply explains the texture of makeup.
  15. Money Talk and it talks about Makeup on a Budget. She kindly gives you advice on what makeup is necesarry to spend more money on than others. This list is very helpful if your on a tight budget and don't know where to spend your money on more.
  16. Speedy Recovery talks about makeup on the go. This chapter gives you ideas on which products you can use to still achieve amazing looks when your time is stretched.
  17. Use By gives you information of the life expectancy of makeup. This guide is very helpful to know how long you can use your products for.
  18. Advanced Adornment is about makeup for mature faces. I think adding this chapter in the book is extremely useful and thoughtful. All makeup books offer modern day makeup for young girls, so this is very nice to have for the more mature ladies.
  19. Fountain Of Youth focuses on makeup for young girls, which basically tells you that less is more for teen makeup.
  20. A Man's World is focused (obviously) on makeup for men. I think this is extremely useful if you plan to be involved in television/film makeup industry. It's basic, but useful.
  21. Perfection V's Picturesque is a very nice chapter talking about your natural beauty and giving you a boost of confidence.
  22. Makeup Method gives you step-by-step guides. It offers details of different makeup looks and ways to achieve them. Includes list of what you need, steps, picture and sketches.

Additional Information
Cassandra Rae Ferguson has two additional books which are Makeup Mandate or Myth? ($9.95) or The Makeup Artists Mandate ($14.95). I think they're very affordable, especially for the amount of great information that you get. The one i mentioned in this post, The Makeup Mandate is $14.95.
You can check out her website www.cassandraraeferguson.com.au
Or visit her blog called Makeup Eutopia

Disclaimer: I was contacted by Cassandra Rae Ferguson and sent a free ebook copy of her first book to review.
My opinion is honest and true about what i think of it.

Tuesday, June 22, 2010

Achieving the perfect nude lips

There are so many ways to achieve this look depending on the type of lips you have and color of your skin. You have to find what work best for you, so you don't look like a zombie, unless you're going for that sort of look LOL. If you have a skintone and complexion close to mine, maybe my way will work for you.

The most important part is to moisturize your lips. You don't want your lips to be cracked and dry, so the lip color wont set between the lines. There are so many you can use, depending on what you think works for your lips. There are high brands that work and the one i heard really good things about is the Korres Lip Butter. It has about seven different flavors you can choose from. You can find it at Sephora for $10. If you don't want to spend so much on a lip moisturizer, you can go to your local drugstore and find a lot of good ones that are under $5. My favorite brands include Carmex, Nivea and Burt's Bees. You can find a lot of different ones, so go ahead and pick what you prefer or what works best for your lips.

If you happen to have very pigmented lips, like myself, you want to consider toning down the pigmentation by covering them with a bit of concealer. You can also use foundation if you want. This step is weird if you don't moisturize your lips before, because concealer dries out your lips. Mac had its own Lip Erase if you want to go ahead and find that one, but i dont think its really worth it. You can make your own if you want a moisturized concealer by mixing something like Vaseline and concealer. Check out what i did HERE. The cheapest, easiest way is to use your concealer or foundation. The one i use all the time is the NYC Cover Stick that you can find at Ulta for about $2. It looks like a lipstick so it works perfectly i love it.

This is the fun part! Choosing the nude shade you want to go with. The ones i have are Mac Creme D'Nude, Mac Peachstock, Revlon Smooth Nude, Revlon Nude Attitude. The ones i also recommend looking into getting are from NYX (Circe, Orange Sode, Pumpkin Pie.etc). They have a great variety of nude lipsticks for various skintones. Another one that has a good price that i want to get is by E.L.F and its called Natural Nymph. Also popular ones from Mac are Myth and Blankety. Another one that i REALLY want to get is Belle De Jour by Nars. There are a lot of various brands that have good nude lipsticks, depending on your skin color or what type of nude you're looking for. The ones i mentioned are the ones that i personally love wearing or are on my wishlist.

This step is optional depending on the consitency of the lipstick you decide to wear. If the lipstick has a shine to it and you like it by itself, you can skip adding any type of lipgloss. Of course there are nude lipglosses you can wear by themselves, if you love the shine and want to skip the lipstick step. If you wear a nude matte lipstick, i highly recommend you add some type of shine to it so you dont look dead. Its up to your personal preferance when it comes to lipgloss. You can use a clear one to keep the shade of the lipstick, or you can wear a subtle colored lipgloss, if you feel the "nudeness" is too pale. I love wearing clear gloss with little sparkles to brighten the lips.
__________________________
What do you do to get the perfect nude lips?

Saturday, June 12, 2010

My Current Face Routine...

I thought i would dedicate a post about what i use on my face on a regular basis. Even though i do mention the products in my FOTD's, i thought i'd go in fuller detail.

Before i apply anything on my face, i make sure it's clean. You want to start off with a clear canvas so the makeup you put on doesn't look ugly. You can check out my post on the products i use to keep my face clean and clear HERE.
Most people start off by applying moisturizer but i like to mix it with my foundation lately, so i don't bother adding some before and OD my skin with too much moisture because i already have oily skin. I use the back of a CD and add a pump of moisturizer. The one i love using is the Biore Dual Fusion with SPF30. It's two different creams in one. One green one, and one white. It's oil free and the spf protects the skin, in case you want to wear it on its own. Moisture and sun protection, all in one tube. For me it works great. I've been using a new one lately and its the Neutrogena Oil-Free Moisture for Sensitive Skin (more on this in another post).
To the one pump of it i add my foundation. The one i love using is the Revlon Colorstay liquid foundation in the shade Warm Golden. I use the one for oily/combination skin. By mixing it with the moisturizer, it becomes a lot lighter and buildable in my troubled spots. It's a very long lasting foundation that doesnt fade by the end of the day, even in this terrible heat. I mix the two and apply it with my Kirkland Signature brush. This is from a set that i got in December from Costco.(see the review HERE). The one i use is the flat top brush. It's small enough to get foundation around my nose, and it blends it easily without streaking. I pick up product, stipple it on my face and then go back and blend it. I go back and apply more foundation under my eyes and in my troubled spots with my finger, instead of going back and apply more all over my face.
After the foundation is on my face and i have that flawless finish i want, i set it with my favorite setting powder, the NYC Translucent loose powder. I've been raving about this a bunch of times and i still think it's the best one. It can get a bit messy though since it is a lose powder but i dont mind it much anymore. It sets the foundation and leaves my skin matte and soft. I like my face matte because i usually add shimmery highlights and blushes that brighten up my face.
The last thing i do to my face is filling in my eyebrows. I only love using my Wet'N'Wild brow pencil in Dark Brown. I've talked about this multiple times. I've tried powder and the famous maybelline define-a-brow but i still end up going back to my wet'n'wild. It has a waxy consistency, so it automatically tames my eyebrows while i shape them and color them in. It's only 99 cents at any local drugstore. I use the angled brush from the Kirkland set. It's amazing for it.

That's basically all the products i use for my face everyday. For my eyes it varies depending on what i feel like doing that day and i match up the blush with it. Same goes for my lips. If you want more detail on what i like to use and how i use it let me know and ill make a seperate post about each.
_______________________________
What's you current face routine?